Masking Technique


Hello, my crafty friends! Today for Tips & Techniques Tuesday I am sharing the Masking Technique. Super Fun and Easy Technique. Ready to get started? Let's gather our supplies for today's technique.
Supplies:
Click on the item to order the supplies from my online store.
Stamp Sets: May 2023 Exploring In Color Paper Pumpkin and
March 2021 Here's To You Paper Pumpkin Set
Inks: Old Olive, Bubble Bath, Crushed Curry, Momento Tuxedo Black
and Rich Razzleberry (retired ink color can be substituted: Orchid Oasis)
Card Stock: Basic White, Basic Black
Measurements:
Basic White card Base: 5 1/2" x 8 1/2" scored at 4 1/4"
Basic White Card Mat: (cut 2) 3 3/4" x 5"
Basic Black Card Mat: (Cut 2) 4 x 5 1/4
Masking Strips: 1" x 5 1/2"
Masking Scraps for images and sentiment

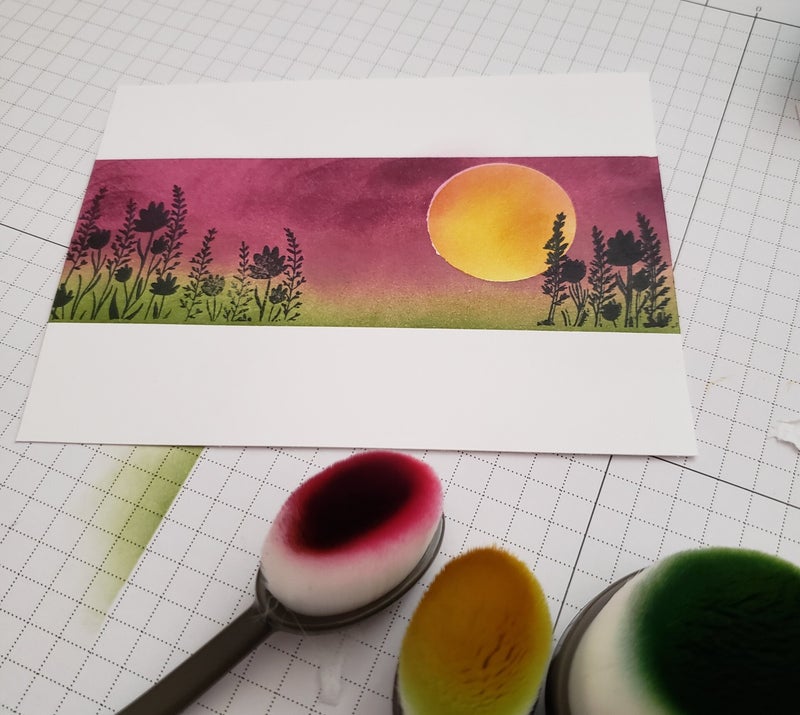
Masking Step 1
Peel off the blue backing on the masking strip (1" x 5 1/2" pieces) Place masking strip on the top and bottom of one of the Basic White Cardstock Mats (3 3/4" x 5"). I used my grid paper for placement, counting down 4 squares from top and up four squares for bottom. Peel off backing on the circle and place where you would like the sun on your piece.
Masking - Step 2
Using your Blending Brushes ink your cardstock. I used a heavy hand on this piece, but you do you and make it yours. Just be careful inking around the circle so it doesn't lift up on you. If it lifts, just press it down again and carry on. These masks are reusable if you plan to mass produce this project. Once you are happy with the ink blending remove the circle mask and proceed to Step 3.


Masking - Step 3
Place the negative piece around your white circle as shown (TIP: make the piece bigger so you don't have wrinkling of the mask or have to be very careful inking the sun.) I used Crushed Curry for the sun color and then went back to try to cover my Opppsie from the wrinkled mask.
Remove ONLY the circle Mask and proceed to Step 4.
Masking - Step 4
Using Moment Tuxedo Black Ink Stamp your images and then remove the masking strips. I just love masking like this! Try it out and show me your creation!
Now let's Mask a Sentiment.

Masking-Sentiment
This is done a little differently. Stamp your sentiment on the second basic white mat ( 3 3/4" x 5") and stamp the sentiment on the masking sheet.
THEN fussy cut the sentiment stamped on the masking sheet. (I know, some of you don't like to fussy cut....but it is so worth the end results.)
Once you get through the fussy cutting (I know you can do it!) peel off the backing from the masking sheet and place it directly over the stamped image on your basic white card stock.
Stamp your image right over the sentiment.
Peel off your mask and there you have it...a unique way to present a sentiment in a card.
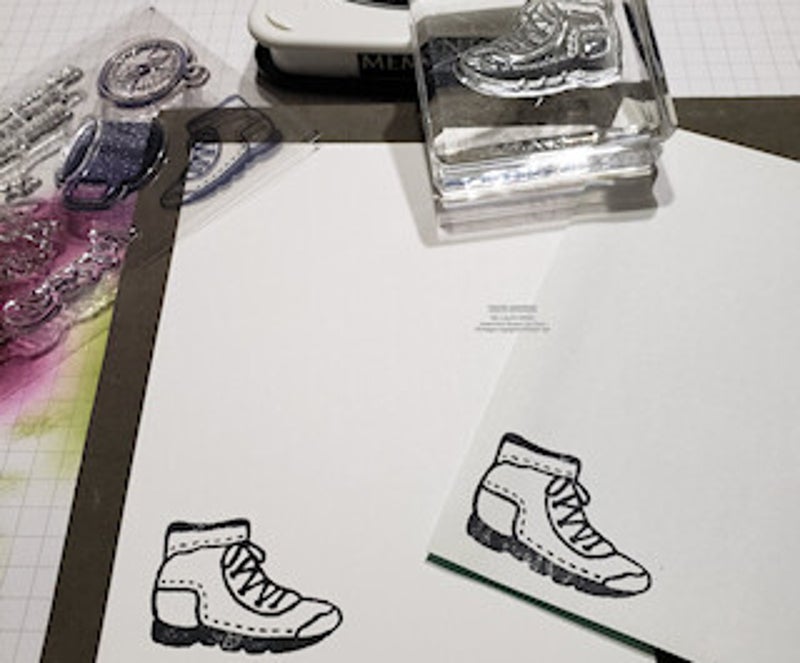
Masking-Image
Masking an image is the same as we did for the sentiment. Stamp the image on the cardstock and on the masking paper. Fussy cut the image out and place it directly over the stamped image on the cardstock. (Tip: Place the masking sheet image so that just a smidge of the image on the cardstock shows so you won't have any gap in the images.) Stamp your image on the cardstock. The second image below show the mask in place and the second boot stamped over the mask. After removing the mask, the end result is the last image. Don't you just love it?


Add comment
Comments
Great explanation on this fun technique!