
Hello, my crafty friends! Today I have a tutorial for an A2 card box and note cards. I hope that my supplies from Stampin' Up! will arrive today so I can start using all the new colors and stamp sets to share with you. For now, I am using what I have to create. You can use any DSP or Cardstock to make it your own. This is the best box I have found for A2 cards. I believe the Paper Pixie gets credit for the design of the box. I have used this box for all my A2 cards because it is sturdy with the reinforced sides, plus it is definitely a neat and clean design. These boxes are great for giving cards as gifts.
SUPPLIES AND MEASUREMENTS:
Box Base 8 1/2" x 9 7/8" scored at 1" and 2" on all four (4) sides
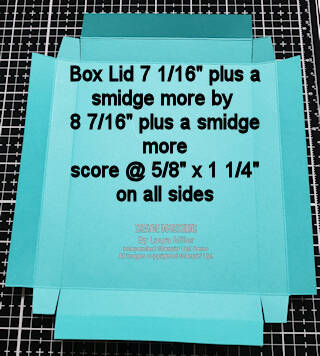
Box Lid 7 1/16" plus a smidge more (this must be done for the lid to fit properly) by 8 7/16" plus a smidge more; scored at 5/8" and 1 1/4" on all four sides.
Mats for the card lid
Basic White 4 1/4" x 5 5/8"
Real Red 4 1/8" x 5 1/2"
DSP 4" x 5 3/8"
Ribbon: Real Read 18"
Mini Card Base for front of Box 2" x 4"
Basic White Mats 1 7/8" x 1 7/8"
Heart Punches
A2 Note Cards:
Card Base: 8 1/2" x 5 1/2" scored at 4 1/4"
Basic White Mat: 4" x 5 1/4"
Colored Cardstock Mat: 3/4" x 5
DSP Mat: 3 1/2" x 4 3/4"
Inside mat: 4" x 5 1/4"
Assembly of A2 Box
After you have cut and scored your box base and lid. You will need to cut away portions of your cardstock as shown in the images to the right. Be sure to miter (slight angle) cut the small tabs.
For Reference: The second image shows the miter cuts better.
Once you have all the cutting done, we are ready to add the Tear and Tape.
Next, we will adhere tear and tape to the box. Please note the placement of the Tear and Tape. On all four small tabs, the adhesive is on the opposite side. On all four sides of the box the adhesive is close to the edge of the cardstock. Burnish tape to give it a good seal to cardstock.
Pull the adhesive off the small tabs and adhere to side, lining up the edges. Once all four tabs are adhered, Pull off the adhesive for the sides. I start with the short side, folding into the box and giving it a good burnish with my bone folder. Then, I adhere the long side.
There you have it...your box base is done. You do the exact same thing for the box lid.
Once both pieces are assembled, check to make sure your lid fits properly. Then add your mats and embellishments to box top.
If you have any questions, please let me know. I would be happy to help you with your project.
Creatively,
Laura


Add comment
Comments
THanks for the instructions to make this box! I can make this ahead of time and then the cards to go inside for a quick gift when I need on for a birthdy or a special celebration!
Love what you do and that you share it all!